Friday, August 2, 2013

Current collection of bikes

This is my 11th homemade recumbent out of 13 I built and is my primary bike now.  It is approaching 27000 miles.  The 4th recumbent I built also had about 27000 miles on it when I sold it and it is still going under a new owner. 
 I also ride 2 home built crank forward bikes which I featured in earlier posts, one based on a Huffy mountain bike and one that disassembles for transporting in a car trunk. 


This is the ninth recumbent I built and I sometimes
use it when my number 11 recumbent
 is down for maintenance.


This is a Sanyo E-bike we bought about a year back for the wife to ride but she hasn't ridden it much.
I have 6 kid bikes that get occasional use by visiting grand kids.

Wednesday, February 22, 2012

Crank Forward number 7


Crank forward number 7 is based on a Huffy mountain bike frame. I think I picked this frame out of a junk pile but if I bought it I didn't pay more than $5 for it. My first plan was to make a cheap single speed campus bike and try to make a small return for my work by selling it on Craig's list. I wanted to try a little less offset of the seat to bottom bracket than my previous CF bike to improve hill climbing and stand up pedaling. The resulting frame has a wheelbase of 46 ", rear stays at 22" and a seat tube angle of 56 degrees. There is still enough crank forward to get both feet on the ground with proper leg-to-pedal adjustment but just barely. The resulting bike seems pretty responsive for a cheap iron Huffy. The rear triangle is short enough that the front wheel is pretty easy to loft making for good curb hopping as a city bike. I had the original single speed gearing set at about 50" by using a cluster with a 20 tooth gear and a chainring of 39 teeth. I liked riding this bike so well I decided to see how it would do with a wide ratio 5 speed setup. I used an old suntour 14-32 cluster and kept the 39 tooth chainring and the result is 5 very usable gears.


I used the wire welder in building the handlebar riser and seat post mountings as well as for tacking small parts in place for brazing. The .035" self fluxing wire would be too much for a nice thinwall Cro-Mo bike but the old Huffy frame is pretty good for mig welding practice. I used dollar Wal-Mart flat black paint on the frame and the result is pretty good for so little prep work. I like being able to go back and touch up spots where I've added braze-ons without having to repaint the whole frame. Sadly, our local Wal-Mart doesn't seem to be carying the dollar paint in flat colors any more.


My next project may be to make a fold down version of the handlebar riser so the bike will fit easier into my van. I'm thinking that if it folded forward, you could turn the front wheel back and the whole bike would fit on a city bus rack like a standard 26" cruiser bike. Then, maybe add a couple hinges to the frame and make it fit into a compact car trunk like CF1 does...

Wednesday, October 5, 2011

Cargo Handling on a bike


Here are a couple of cheap solutions for hauling stuff. On the recumbent I a common milk crate can be attached to the rear rack for hauling things. This works well for carrying oil jugs, gas cans, groceries, or materials for recyling. This picture shows the crate attached to my 20x20 LWB homebuilt recumbent using 2 toestraps at top front and a bungee cord across the bottom.


Folks with Rans 'bents that have highback seats can carry things pretty good in plastic grocery bags tied to the top crossbar of the seatback.


I like to use a crank forward for short errands around town and for this I usually use a cloth shopping bag with about 20" of nylon tent rope to connect the handles to the other side of the rear rack. I leave the piece of rope attached to one handle and when its ready to load on the bike I take a loop around the second handle ane hook the 2 loop ends onto the lower hooks of the rear rack.


This system is works pretty well for carrying 5 qt. oil jugs, library books, or groceries. One caveat here; if the bag is not filled very full, it has a tendancy to rub on the rear wheel--this could cause real trouble if it gets mixed up in the back wheel so some experimenting with the load before getting up to speed is strongly recommended. If I don't have much stuff to carry, I just bungee the bag on top of the rack. This bag system has two strong points; price ($1.00 per grocery bag) and it doesn't weigh much or take up much room when not in use.


Saturday, December 18, 2010

Three dollar crank forward


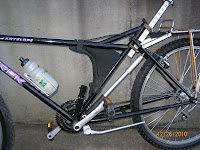
A couple months

back I stopped at a garage sale that had a couple mountain bikes leaning against a tree. They had no prices posted--one was a dimestore clunker with 24" wheels and one was an old Trek 26" mountain bike. I got brave and asked how much for the Trek and the lady said $6 would buy both but I managed to take home only Trek for $3.00. I figured the bike would be in sorry shape as rusty water ran out of the frame when I loaded it into my van but when I tore things down I found all the bearings in good shape, needing only a good lube job. The shifters seemed to work pretty slick--they are a 3x7 trigger shift system and all rust cleaned off pretty easy. The tires have no noticable wear, so I decided to turn this bike into a crank forward cruiser by moving the rear wheel and seat back about 7 inches. Most of the added tubing is .035w 4130 Cro-mo 1" OD from Aircraft Spruce http://www.aircraftspruce.com/index.html and Airparts http://www.airpartsinc.com/ .
The seatpost is 1" square 1/8" wall aluminum tube.

Total investment is still under $100 with brazing gas and tubing counted. The finished bike weighs about 30 lbs and is a great ride. I put about 60 miles on in the first week or so even though our daytime high temps have seldom exceeded the freezing point here in KC. I'll tear the bike down and paint the bare parts black to match the rest as soon as the next snowstorm forces me to stay inside for a couple days.
Update 12/26/2010: I finished painting and reassembling the bike today and added the 2 new pictures above. I kept the old paint on the front half of the frame and just repainted the back half. I also added 1.5" in length to the handle bar ends by making some bar plugs out of dowel rod and aluminum tubing.

Friday, June 11, 2010

Motor bike idler re-design

The idler kit for these cheap motorbike kits is pretty lame. Notice the clamp that grabs the chainstay and the slot the idler pully has to move up to tension the chain. This setup seems to let the chain loosen up after about 5 minutes of riding time. The nylon pulley is probably not nearly as satisfactory as an idler sprocket would be but that upgrade will have to wait for later. My current effort has been centered around the mounting and adjustment portions of the idler system.


Here is what I came up with. The new unit uses a swing arm pivoted from the bottom rather than a slot for moving the pully against the chain. Note the welded on tab on the chainstay and on the seatstay where an adjustment screw can be hand tightend and then locked with a wingnut to pull the chain into the desired tension. I'm thinking that having the tensioner setable without tools will enable the chain to be removed from the sprocket out on the road, making the bike much easier to roll back home should the motor quit (hope for the best, plan for the worst).


Wednesday, June 9, 2010

4 stroke bike


This project came about when my son sent me home with a bike motor kit and asked me to turn it into a motorbike. The motor is a 48cc 4-cycle with centrifugal automatic clutch. A friend gave me an old Phillips 3 speed frame and I had a heavy duty fork in the shop as well as some steel 26" wheels and some extra tires. The motor is fairly smooth and quiet and pulls up hills pretty good, which is fortunate as there was not room enough for pedals to be installed. The gearbox generates some whine and the chain idler will need some improvement but the finished product shows promise as a fun little motor bike.

Friday, March 26, 2010

Home built AMF Crank Forward


I wanted to try building an inexpensive crank forward so I started with an old AMF single speed bike that had little wear on in but needed some TLC to be ready to ride. I straightened the fork a little and trued up the wheels and adjusted everything to get the bike rideable and then tore it down and cut up the frame and added 4" of length to the chain stays and put in a fatter seat tube and seat post at a more laid back angle and added a piece of tubing across the top of the frame to stiffen it. I built a larger saddle and put on some pull back handlebars to give the crank forward type comfort. I reduced the gearing to about 50" by replacing the front sprocket with a 36 tooth sprocket. I'm too tall to fit on this bike properly but it is much more pleasant to ride than the original was.
Cost of this project was probably under $40 counting paint and brazing supplies.